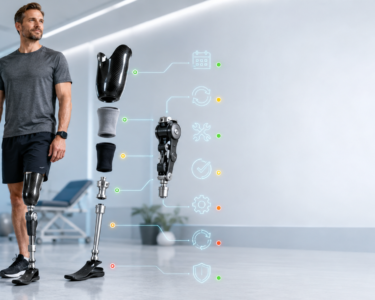

For new amputees, wearing a prosthetic leg for the first time can feel overwhelming. The fit, comfort, and confidence to walk naturally don’t come overnight—it’s a proc
Losing a leg is a life-changing event that affects not just mobility but also confidence, independence, and emotional well-being. The process of learning to walk again—whether with a prosthetic limb or using assistive devices—can be physically and mentally challenging. However, with patience, practice, and the right support, amputees can regain their mobility and confidence, allowing them to live active and fulfilling lives.
If you’re an amputee or supporting someone on this journey, understanding how to improve balance, strengthen mobility, and overcome challenges is key. Here’s how you can take steady steps toward walking with confidence.
Understanding Balance After Amputation
Balance is something most people take for granted until they lose a limb. When one leg is missing, the body must adjust to a new center of gravity, which can make standing and walking feel unnatural at first. It takes time for the body to compensate for this change, and proper training is essential to prevent falls and injuries.
Factors that affect balance after amputation include:
Muscle Strength: The remaining muscles in your legs, core, and back need to work harder to stabilize your body.
Prosthetic Fit: A well-fitted prosthetic leg is crucial for maintaining balance and walking comfortably.
Posture and Alignment: Learning the right posture helps distribute weight evenly and prevents strain on the residual limb.
Surface Adaptation: Walking on different surfaces (grass, pavement, stairs) requires practice and adjustments.
Building Strength for Better Mobility
Strengthening your body is one of the most important steps in regaining confidence in movement. A strong core and lower body improve stability, reduce fatigue, and make prosthetic use easier.
Exercises to Improve Strength and Balance
Core Workouts: Planks, seated abdominal twists, and side leg lifts help stabilize the body.
Single-Leg Balance Training: Practicing standing on one leg (with support at first) helps improve stability.
Step-Ups and Weight Shifting: Practicing stepping up and shifting weight between legs builds coordination.
Stretching and Flexibility Work: Gentle stretching keeps muscles flexible and prevents stiffness.
Working with a physical therapist can ensure you’re following a safe and effective routine tailored to your needs.
Getting Comfortable with a Prosthetic Leg
For many amputees, using a prosthetic leg is a new experience that takes time to master. At first, even simple movements like standing or taking small steps may feel strange or unsteady.
Here are some tips to help you adapt:
- Take it Slow: Start by practicing standing with even weight distribution before attempting to walk.
- Focus on Posture: Stand tall with shoulders back to prevent leaning too much on one side.
- Use Handrails or Support: In the beginning, walking with parallel bars or a cane can help you gain confidence.
- Practice Walking in Different Environments: Try walking on carpets, hardwood floors, and outside surfaces to improve adaptability.
Over time, as muscle memory builds, movement will become more natural, and you’ll rely less on external support.
Overcoming Mental Barriers to Walking Again
Regaining mobility isn’t just a physical challenge—it’s an emotional one too. Many amputees experience fear, anxiety, or frustration while learning to walk again. It’s completely normal to feel this way, but overcoming mental barriers is just as important as physical training.
Be Patient with Yourself: Progress may be slow, but small improvements add up over time.
Set Realistic Goals: Focus on one milestone at a time, such as standing for longer periods or walking a short distance.
Seek Support: Joining amputee support groups or talking to others who’ve gone through similar experiences can be incredibly encouraging.
Celebrate Every Step: No matter how small, every improvement is a victory worth recognizing.
Seeking Professional Guidance
Working with a physical therapist and a prosthetist can make a huge difference in how quickly and effectively you adapt to walking again. They can:
- Help improve balance and gait (walking pattern).
- Teach you how to safely use your prosthetic leg.
- Adjust your prosthetic fit to ensure comfort.
- Provide exercises that suit your specific mobility level.
Never hesitate to reach out to professionals when needed—proper guidance can prevent injuries and make your journey smoother.
Embracing Independence with Confidence
Walking again after an amputation is a journey that takes time, effort, and resilience. The road may be challenging, but with the right approach, it’s entirely possible to regain mobility and live a confident, active life.
Every step forward, no matter how small, is a testament to your strength and determination. Keep pushing forward, trust the process, and soon enough, walking with confidence will feel natural again. Choosing a reliable prosthetic limb manufacturer in India ensures you have the right support and technology to make this journey smoother.ess that requires patience, practice, and the right techniques. A well-fitted prosthetic leg can help restore mobility, but knowing how to wear it properly is just as important. In this guide, we’ll walk through the essential steps to ensure a comfortable and secure fit, helping you move with confidence.
Step 1: Ensure Your Residual Limb is Healthy and Ready
Before putting on your prosthetic leg, your residual limb must be in good condition. Keep these factors in mind:
- Check for Swelling: Swelling is common after amputation. If your residual limb is swollen, using a shrinker sock can help shape and reduce it.
- Inspect Your Skin: Look for redness, blisters, or irritation. Wearing a prosthetic over irritated skin can lead to more discomfort.
- Clean and Dry: Wash your residual limb with mild soap and water daily. Make sure it’s completely dry before putting on your prosthesis to prevent skin issues.
Step 2: Use the Right Prosthetic Liner or Sock
A liner or prosthetic sock helps create a cushion between your limb and the prosthetic socket, reducing friction and discomfort. Here’s how to use them properly:
- Choose the right thickness—sock ply may vary depending on swelling or changes in your limb.
- Ensure the liner is smooth with no wrinkles, as folds can create pressure points.
- Pull the liner snugly over your limb, making sure it covers it evenly.
Step 3: Insert Your Limb into the Prosthetic Socket
Now that your limb is prepared, it’s time to wear the prosthetic leg:
- Sit down in a stable position before putting on the prosthesis.
- Guide your limb into the socket, making sure it fits snugly.
- Adjust until it feels even—your limb should not be pressing harder on one side than the other.
- If using a suction system, remove excess air by pressing the valve or applying pressure to ensure a tight seal.
- For pin-lock systems, listen for the click to confirm the pin has locked in place.
For new amputees, wearing a prosthetic leg for the first time can feel overwhelming. The fit, comfort, and confidence to walk naturally don’t come overnight—it’s a process that requires patience, practice, and the right techniques. A well-fitted prosthetic leg can help restore mobility, but knowing how to wear it properly is just as important. In this guide, we’ll walk through the essential steps to ensure a comfortable and secure fit, helping you move with confidence.
Step 1: Ensure Your Residual Limb is Healthy and Ready
Before putting on your prosthetic leg, your residual limb must be in good condition. Keep these factors in mind:
- Check for Swelling: Swelling is common after amputation. If your residual limb is swollen, using a shrinker sock can help shape and reduce it.
- Inspect Your Skin: Look for redness, blisters, or irritation. Wearing a prosthetic over irritated skin can lead to more discomfort.
- Clean and Dry: Wash your residual limb with mild soap and water daily. Make sure it’s completely dry before putting on your prosthesis to prevent skin issues.
Step 2: Use the Right Prosthetic Liner or Sock
A liner or prosthetic sock helps create a cushion between your limb and the prosthetic socket, reducing friction and discomfort. Here’s how to use them properly:
- Choose the right thickness—sock ply may vary depending on swelling or changes in your limb.
- Ensure the liner is smooth with no wrinkles, as folds can create pressure points.
- Pull the liner snugly over your limb, making sure it covers it evenly.
Step 3: Insert Your Limb into the Prosthetic Socket
Now that your limb is prepared, it’s time to wear the prosthetic leg:
- Sit down in a stable position before putting on the prosthesis.
- Guide your limb into the socket, making sure it fits snugly.
- Adjust until it feels even—your limb should not be pressing harder on one side than the other.
- If using a suction system, remove excess air by pressing the valve or applying pressure to ensure a tight seal.
- For pin-lock systems, listen for the click to confirm the pin has locked in place.
Step 4: Secure the Prosthesis Properly
Depending on your prosthetic type, you might need to adjust straps, locks, or suction systems. Always ensure:
- Your prosthetic leg feels snug but not too tight.
- There’s no pinching or discomfort when you stand.
- If using straps, they should be evenly fastened to avoid imbalance.
Step 5: Stand Up and Check the Fit
Before walking, stand up slowly and check for:
- Even weight distribution – You should not feel like you are leaning more on one side.
- Comfortable alignment – Your knee should not feel hyperextended or bent unnaturally.
- No pain or pressure points – If you feel any sharp pain, remove the prosthetic and check your limb for irritation.
If something feels off, make small adjustments. Over time, you’ll learn what a good fit feels like.
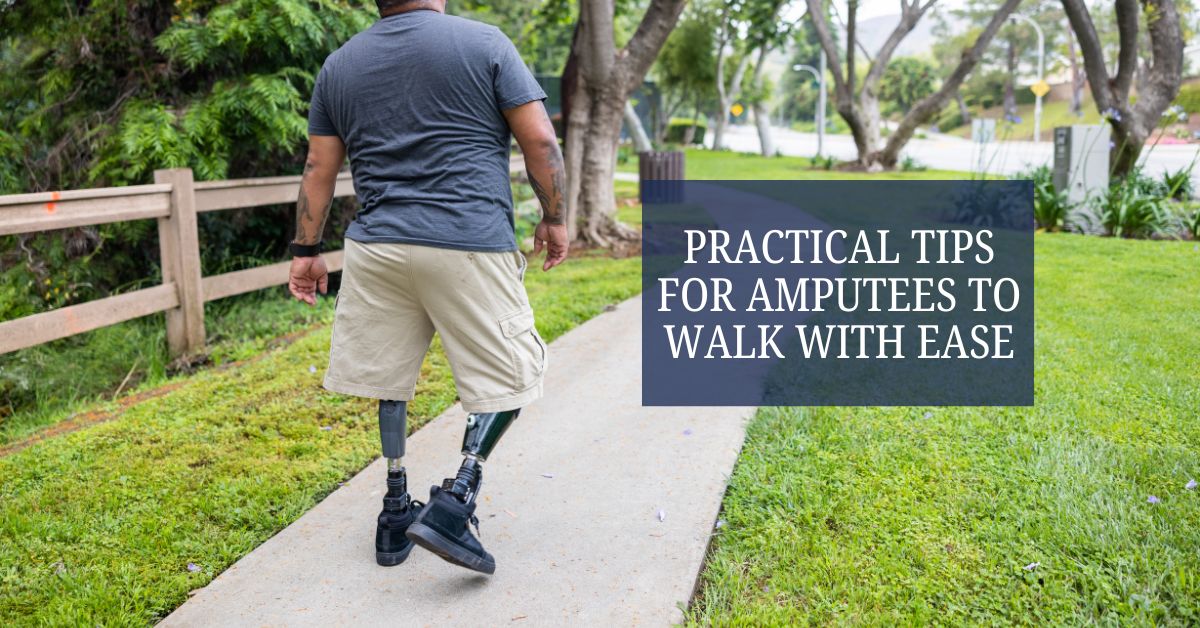
Step 6: Walk with Caution and Confidence
Walking with a prosthetic takes practice. Here’s how to start safely:
- Begin with small, controlled steps while holding onto a stable surface.
- Keep your back straight and avoid looking down at your feet.
- Focus on even strides—don’t favor one leg over the other.
- Work with a physical therapist to develop strength and balance.
The more you practice, the more natural walking will feel.
Step 7: Know When to Adjust or Remove Your Prosthesis
It’s important to recognize signs that your prosthetic may need adjustments:
- If your residual limb feels sore or swollen, remove the prosthetic and rest.
- If the socket feels loose, you may need a different sock thickness.
- If there’s persistent discomfort, consult your prosthetist for modifications.
Your prosthetic limb should feel like an extension of your body, not a burden.
Final Thoughts
Learning to wear a prosthetic leg properly takes time, but following the right steps will help you feel comfortable and confident. Always listen to your body, make necessary adjustments, and seek professional guidance if needed. With practice, patience, and the right techniques, moving forward with a prosthetic can become second nature, allowing you to enjoy a full and active life.
Step 4: Secure the Prosthesis Properly
Depending on your prosthetic type, you might need to adjust straps, locks, or suction systems. Always ensure:
- Your prosthetic leg feels snug but not too tight.
- There’s no pinching or discomfort when you stand.
- If using straps, they should be evenly fastened to avoid imbalance.
Step 5: Stand Up and Check the Fit
Before walking, stand up slowly and check for:
- Even weight distribution – You should not feel like you are leaning more on one side.
- Comfortable alignment – Your knee should not feel hyperextended or bent unnaturally.
- No pain or pressure points – If you feel any sharp pain, remove the prosthetic and check your limb for irritation.
If something feels off, make small adjustments. Over time, you’ll learn what a good fit feels like.
Step 6: Walk with Caution and Confidence
Walking with a prosthetic takes practice. Here’s how to start safely:
- Begin with small, controlled steps while holding onto a stable surface.
- Keep your back straight and avoid looking down at your feet.
- Focus on even strides—don’t favor one leg over the other.
- Work with a physical therapist to develop strength and balance.
The more you practice, the more natural walking will feel.
Step 7: Know When to Adjust or Remove Your Prosthesis
It’s important to recognize signs that your prosthetic may need adjustments:
- If your residual limb feels sore or swollen, remove the prosthetic and rest.
- If the socket feels loose, you may need a different sock thickness.
- If there’s persistent discomfort, consult your prosthetist for modifications.
Your prosthetic limb should feel like an extension of your body, not a burden.
Final Thoughts
Learning to wear a prosthetic leg properly takes time, but following the right steps will help you feel comfortable and confident. Always listen to your body, make necessary adjustments, and seek professional guidance if needed. With practice, patience, and the right techniques, moving forward with a prosthetic can become second nature, allowing you to enjoy a full and active life.
Disclaimer: The information provided in this article is for general knowledge and educational purposes only. It should not be considered medical advice, diagnosis, or treatment. Prosthetic solutions vary based on individual needs, medical conditions, and professional recommendations. Always consult with a certified prosthetist, healthcare provider, or medical professional for personalized advice and the best prosthetic options for your specific situation.